Back to the home page

You can easily access your network disk (NAS) by means of the fine network browser Gigolo.
The how-to below has been written primarily for Linux Mint Xfce, but it's also useful for Linux Mint Cinnamon, Linux Mint MATE and Xubuntu.
Installation and configuration of Gigolo
1. Gigolo only works well, when some supporting software has been installed, too. Furthermore, you need to configure it right. Below I'll describe how to do that.
1.1. You can install Gigolo and the supporting software like this (first ensure that you have internet connection):
Launch a terminal window.
(You can launch a terminal window like this: *Click*)
Copy and paste the following command line into the terminal:
sudo apt-get install samba gigolo fuse gvfs-backends
Press Enter. When prompted, type your password. In Ubuntu, this will remain entirely invisible, not even dots will show when you type it, that's normal. Press Enter again.
1.2. Now prepare your firewall.
Normally, your firewall should be turned on. If it's on, then you have to add an exception for your network disk.
Like this:
Launch a terminal window.
(You can launch a terminal window like this: *Click*)
Copy and paste the following command line into the terminal:
sudo ufw allow Samba
(when you type this command line instead of copying it, note the capital S of Samba!)
Press Enter. When prompted, type your password. In Ubuntu, this will remain entirely invisible, not even dots will show when you type it, that's normal. Press Enter again.
1.3. Now you launch Gigolo: Menu button - System - Gigolo
Toolbar Gigolo: Edit - Preferences - tab Interface
Check:
- Start minimized in the Notification Area
- Show side panel
Remove the check for:
- Show auto-connect error messages
All should be like it's shown in the screenshot below (click on the image to enlarge it):

Now click the tab Toolbar - Style: set it to Both
See the screenshot below (click on it to enlarge it):

Click Close to leave the Preferences.
1.4. Now click on the tab Network (vertical text) on the left. Then you see the available network, with the network disk.
Right-click on the disk and select Create Bookmark. See the example below (click on the image to enlarge it):

Now the "Edit Bookmark" window pops up.
In that window, check: Auto-Connect. See the screenshot below (click on it to enlarge it):

Gigolo has been configured now to connect to the network disk (NAS) automatically. So it'll connect automatically to your network disk, within 60 seconds. Simply wait a moment!
Don't want to wait for the connection? Then click on the tab Bookmarks (vertical text) on the left, and double-click on the bookmark.
Accessing the network disk has become easy now: just double-click on its icon in Gigolo, or launch your file manager and click your way....
When the network disk isn't turned on, Gigolo will try every 60 seconds to make a connection.
If you wish, you can change the default interval of 60 seconds in the Preferences (Toolbar Gigolo - Edit - Preferences - tab General - Bookmark Auto-Connect Interval).
1.5. Finally, make Gigolo launch automatically, by adding it to the startup applications. In Xubuntu and Linux Mint Xfce you can do that like this:
Menu button - Settings - Settings Manager - Session and Startup
tab Application Autostart: click Add
Type the following text in the entry fields:
Name:
Gigolo
Description:
connect to network disks automatically
Command:
gigolo
(note that there's no capital letter in the command!)
Click OK and then Close.
1.6. Reboot your computer. If all is well, your network disks (NAS) should be mounted automatically by Gigolo.
You should be able to see that Gigolo is active in a minimized state, by the inobtrusive icon of Gigolo in the system tray. See the screenshot below of Linux Mint Xfce (the arrow points it out):

In some Linux distributions, like Xubuntu, Gigolo's system tray icon looks different. Unfortunately almost identical to the icon of Network Manager. See the screenshot below (the arrow points it out):
By a click on the icon, you launch the Gigolo window.
Note: startup applications are a user preference, so repeat step 1.5 in each user account.
Edit and remove Gigolo bookmarks
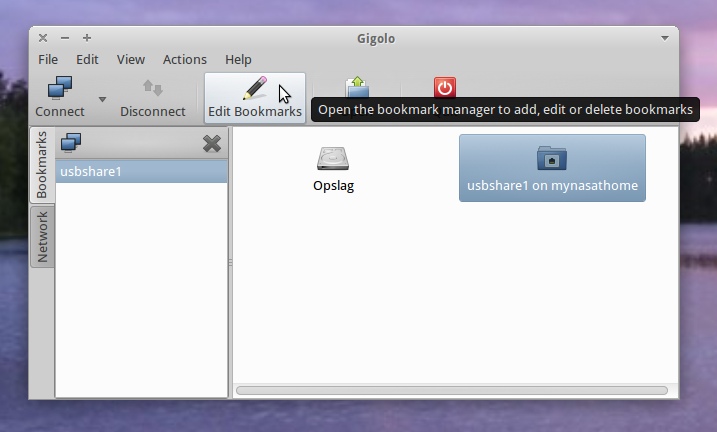
2. You can edit or remove Gigolo bookmarks as follows:
Click on the tab Bookmarks (vertical text) on the left. Then click on the bookmark that you wish to edit or delete, and then press the button Edit Bookmarks in the toolbar.
See the screenshot below (click on it to enlarge it):
In the window that pops up then, you click on the network disk and then you click Edit or Delete. See the screenshot below (click on it to enlarge it):

That's all.... Enjoy this simple and very useful little tool!
Want more tips?
Do you want more tips and tweaks for Linux Mint? There's a lot more of them on this website!
For example:
Speed up your Linux Mint!
Avoid 10 fatal mistakes
To the content of this website applies a Creative Commons license.
Back to the home page
Disclaimer