Back to the home page

Sometimes it's useful to have a second router in your home. For example to improve wireless connectivity on another floor: you then place a second wireless access point.
Or to supply internet connection to a desktop computer on the attic, when the distance is too big for a normal wireless network card an there's no networking cable either: you can then deploy a wireless ethernet bridge.
Below I'll explain how to do that.
Before you go ahead: first consider whether a reduction in electromagnetic radiation might not be a better idea for your health....
Note: Don't buy a so-called repeater or range extender! Because with a repeater or extender you usually lose half your internet speed, as the wireless card of the repeater or extender has to receive and transmit the bandwidth simultaneously (which most repeaters do on the same channel). It's technically an inferior solution.
Deploying a second router is technically a far better approach, because then you do preserve your entire bandwidth.
Contents of this page:
- 1. Second router as second wireless access point (requires a cable connection between the two routers)
- 2. Second router as wireless ethernet bridge (connection between the two routers is wireless)
- 3. Want more tips?
Second router as second wireless access point (requires a cable connection between the two routers)
There can only be one captain
1.1. To get that second router to operate as a second wireless access point for your internet, you usually have to adapt its settings, or it won't work. Because a network is designed by default to have just one router: that's the machine that allocates IP addresses to the connected computers. The router is the "captain" of the network, and there can only be one captain.But when the IP address range of router 1 differs from the range of router 2, then there's no problem. Simply connect router 2 to an ethernet (LAN) port of router 1, and you're done.
The IP address range is at 192.168.x.x. When router 1 distributes its IP addresses at 192.168.1.x and router 2 for example at 192.168.8.x, then router 2 is straightaway fully functional. They're both captain of their own range then; no interference at all.
But when they both have their IP range at 192.168.1.x, which is by default usually the case, then router 1 blocks router 2. The solution is simple: just separate the two IP address ranges. Below I'll describe how to do that.
Router 1
1.2. Router 1 should simply be deployed as usual, as if there were no second router at all. When you already have an operational router: don't change anything for it!Router 2
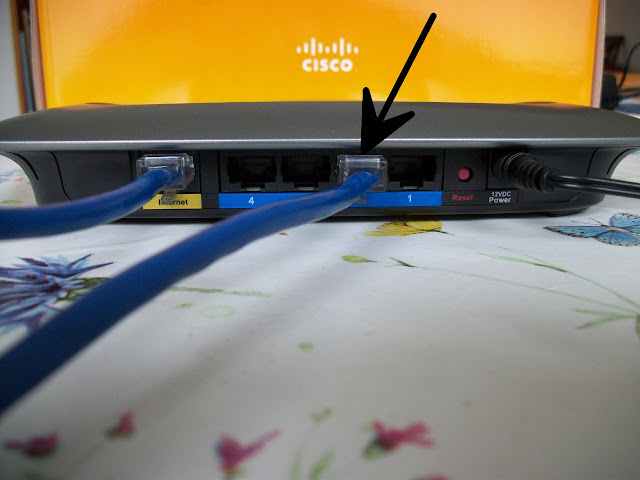
1.3. Take a computer that's not connected to the internet, neither wireless nor wired. It should have no connection at all to router 1.Now plug an ethernet cable into this computer, and plug the other end of this ethernet cable into one of the ethernet (LAN) ports of router 2. So do not plug the ethernet cable into in the WAN port (sometimes called internet) of router 2!
You can see an example of router 2, on the screenshot of a TP-Link router below:
On the computer, you then call up the configuration panel of router 2, by means of your web browser (Firefox, Chrome, ....). For example: for Linksys routers this settings panel is usually at "web page" 192.168.1.1
Now the main operation:
In the configuration panel of router 2, you give it an IP range that's outside the range of the DHCP server of router 1. For example: you set the IP range of router 2 to 192.168.8.100.
192.168.8.100 is an unusual IP range, so with that you're probably OK. When in doubt, check the settings of router 1.
See the screenshot below, of a TP-Link router (click on the image to enlarge it):

For this particular TP-Link router you have to make sure that in the section DHCP Settings, the items Start IP Address, End IP Address and Default Gateway are all set to 192.168.8.x.
But for some routers, amongst which those of Linksys, you only have to change the Local IP Address in the section Basic Settings, from 192.168.1.x to 192.168.8.x. The rest of the settings are then automatically being changed accordingly, by the operating system of the router itself. Even easier...
Note: in the example given, the configuration panel of router 2 then moves automatically to "web page" 192.168.8.1. So you'll need to disconnect your computer from router 2 then and reconnect again, in order to access the configuration panel on the new location: "web page" 192.168.8.1.
Other important settings:
- Give the wireless network of router 2, an SSID (network name) that differs from the SSID of the wireless network of router 1.
- Make sure that both wireless routers don't transmit on the same channel, because then you might lose signal strength because of the interference. Channels that are at least five channels away from each other, like 1, 6 and 11, don't overlap at all and therefore don't interfere with each other's signals.
The final step
1.4. Now you're almost done!- Disconnect router 2 from the computer (physically, so unplug the ethernet cable).
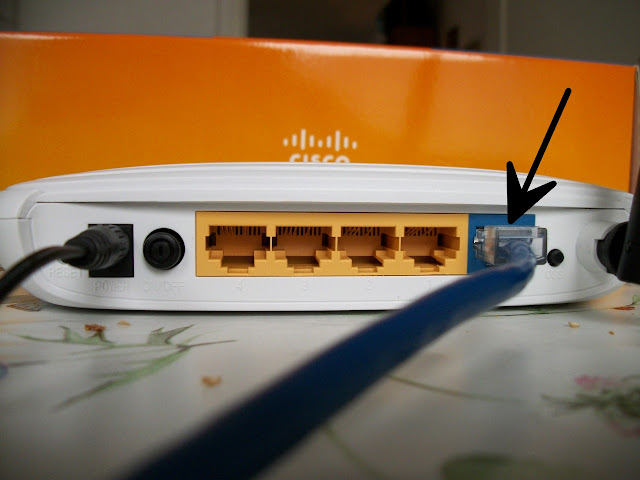
- Move the ethernet cable in router 2, from the ethernet (LAN) port to the WAN port (sometimes called: internet). See the screenshot below of router 2:
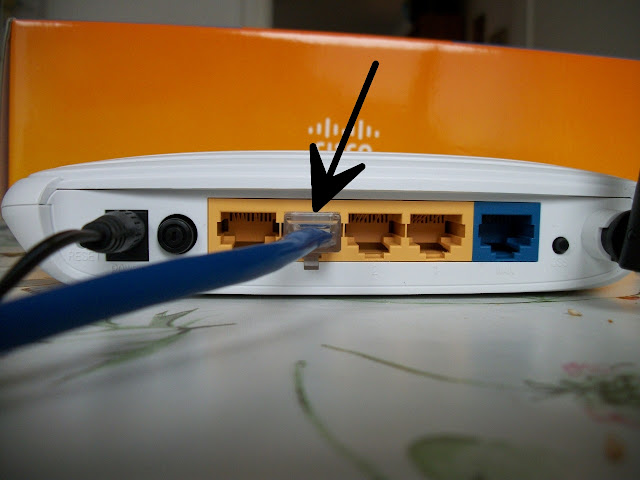
- Now plug the other end of that ethernet cable, into one of the ethernet (LAN) ports of router 1 (any ethernet port will do). See the screenshot below of router 1, a Linksys router:
You're done! You now have a fully functional second wireless access point.
Off topic: is your wireless security OK?
Second router as wireless ethernet bridge (connection between the two routers is wireless)
2. A router that's been turned into a wireless ethernet bridge, is perfect to supply internet to a computer by means of a powerful and sensitive wireless transmitter/receiver. Because a router is much more powerful and sensitive than a normal wireless adapter. Mainly because of the larger antennas, by the way.This is what an ethernet bridge is about: it turns your router into a wireless adapter.
The interesting part is, that the internet enters the bridge wirelessly, and is being transmitted by wire to the computer. The world upside down....
For this, you set up router 2 as follows:
- Set the encryption to WPA with AES, and make sure that router 1 is set to that as well, because they have to match exactly. Note: WPA2 won't work!
- Make the SSID of router 2 identical to that of router 1.
- Make the network key (password) of router 2, identical to that of router 1.
- Make sure that router 2 transmits on the same fixed channel as router 1 (for example: 6). Note: ensure that both routers transmit on a fixed channel, and use no dynamic channel).
- Set router 2 to the wireless ethernet bridge mode. Not all router firmwares allow for that; in any case it's possible when your router is running on Tomato or DD-WRT. See the screenshot below (click on it to enlarge it):

But even on a cheap router like the TP-Link WR740N, you can use the default firmware to turn the router into a wireless ethernet bridge. See the screenshot below (click on it to enlarge it):

Now connect router 2 by means of an ethernet cable to the computer that needs internet. Note: in router 2, do not plug the cable into the WAN port (sometimes called: internet), but into one of the four ethernet (LAN) ports!
You're done! The computer now has "wired" internet connection. Router 2 has technically become fully transparant; it has become a wireless adapter.
Tip: do you need a wireless network in the vicinity of router 2? Then simply attach a third router to the "bridge" router 2.
This is how:
- plug the ethernet cable from router 3, into an ethernet port (LAN port) of "bridge"router 2;
- treat router 3 essentially as if you were connecting a second router to router 1 (see item 1.3 on this page). So take care that the IP range of router 3 differs from both other routers. Set it for example to 192.168.5.100.
Off topic: is your wireless security OK?
Want more tips?
3. Do you want more tips and tweaks? There's a lot more of them on this website!For example:
Speed up your Linux Mint!
Clean your Linux Mint safely
Avoid 10 fatal mistakes
To the content of this website applies a Creative Commons license.
Back to the home page
Disclaimer