Back to the home page

This page is outdated!
Contents of this page:
- 1. Update Manager: take full control of your updates and your kernels
- 2. Timeshift: easy system restore
- 3. How-to for Ubuntu 20.04.x
- 4. How to undo
It's possible to supplement the rather basic update tool of Ubuntu 20.04, with a more advanced tool called Update Manager. Made by a former developer of the Update Manager of Linux Mint (mintupdate), so of high quality and reliable. Since then it has been adopted and improved by the developers of Bodhi Linux.
This advanced tool will give you much more control over your updates! It'll also give you useful fine-grained control over your Linux kernels.
Note (1): This how-to isn't meant for Linux Mint. Mainly because Linux Mint already contains a rather similar tool by default.
Note (2): I haven't tested this tool on all official Ubuntu flavours, but it should work in all of them. I've successfully tested it on Xubuntu, which is an Ubuntu derivative.
Note (3): Although Update Manager has been forked off the official Linux Mint Update Manager (mintupdate), it's not exactly the same as that anymore. After his retirement from the official Mint developers team, its developer has modified "his" Update Manager in certain respects. The developers of Bodhi Linux have applied some further modificiations.
Don't need the explanation below? Then go straight to the how-to.
This is what to expect (just a highlight of some of its features):
Update Manager: take full control of your updates and your kernels
1. Update Manager can be configured to show a permanent icon in the system bar, indicating whether there are any available updates or not. When there are no updates, it's a green check in a white shield:
When there are updates, it becomes a white exclamation mark in a blue shield:

The only other notification you get of available updates, is a desktop notification that remains in sight for a few seconds. So it's very unobtrusive, unlike Ubuntu's Update Notifier....
This is its main window (click on the image below to enlarge it):

When you click Tools - Kernel Manager in the panel of Update Manager, you launch a nifty kernel tool. This gives you advanced control over the kernels.
With this, it's for instance very easy to install another kernel (click on the image below to enlarge it):

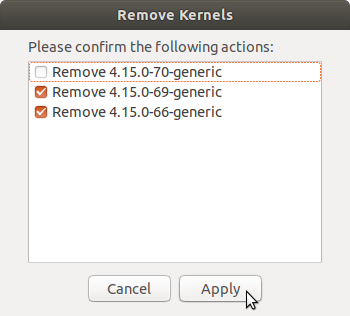
When you click the button Remove Kernels..., you can remove all superfluous kernels in one stroke, by means of the next dialog window you get to see. Click on the image below to enlarge it:

When you click Edit - Preferences: tab Automation in the panel of Update Manager, you can automate the removal of all superfluous kernels (barring the latest superfluous kernel, which acts as reserve, and also barring any manually installed kernels). Click on the image below to enlarge it:

It's very easy to blacklist an update, either just the current version of that particular update, or all current and future updates for a particular package. All it takes is a right-click on an update (click on the image below to enlarge it):

If you wish to edit the blacklist, that's easy as well (panel of Update Manager: Edit - Preferences: tab Ignore List). See the screenshot below (click on it to enlarge it):

An example of a situation when this advanced blacklist feature can be very handy: suppose you know that a particular kernel update is troublesome, so you wish to avoid it. But you do want to be notified about its future successor.
In that case you can simply right-click that kernel update in Update Manager and select Ignore the current update for this package.
Finally, when you click Tools - History of Updates in the panel of Update Manager, you can see all information about past updates. That can be useful for troubleshooting purposes. Click on the image below to enlarge it:

Timeshift: easy system restore
2. I advise to install a third-party tool called Timeshift as well, which is being made by another developer. Although Update Manager can also function without Timeshift, a couple of its features have been tied rather closely to it.With Timeshift you can create snapshots of your system, in order to be able to roll back your system to a working state after it has been damaged. You can compare those snapshots with system restore points in Windows. Below I also describe how to install and configure Timeshift.
How-to for Ubuntu 20.04.x
3. Enough talk for now. Let's get started with this fine software:a. Launch a terminal window.
(You can launch a terminal window like this: *Click*)
b. First you're going to download the key for the repository of Bodhi 6.0 (which is built on Ubuntu 20.04). This software source contains Update Manager. Use copy/paste to transfer the following command line into the terminal (it's one long line):
wget http://packages.bodhilinux.com/bodhi/pool/b6main/b/bodhilinux-keyring/bodhilinux-keyring_2020.12.17_all.deb
Press Enter.
c. Now you're going to install that downloaded key; use copy/paste to transfer the following command line into the terminal:
sudo apt install ./bodhilinux-keyring_2020.12.17_all.deb
Press Enter. Type your password when prompted; your password will remain entirely invisible, not even dots will show when you type it, that's normal.
d. From the menu, launch the application Software & Updates - tab Other Software - click Add... and copy/paste the following apt line into the dialog box:
deb http://packages.bodhilinux.com/bodhi focal b6main
Click Add Source. Then close Software & Updates.
e. Inform your system about the new with the following terminal command:
sudo apt-get update
Press Enter.
f. Now install both Update Manager and Timeshift, with this terminal command (with a switch that excludes the so-called recommended packages, in order to keep the installation as lean as possible):
sudo apt-get install --no-install-recommends mintupdate timeshift
g. Then you need to restrict the old Ubuntu update tools, in order to make full way for the new tool. It's namely better not to use both the old and the new tools.
First you disable the automatic start of Ubuntu's Update Notifier. In a way that's easy to reverse, in case you'd ever want to undo all this.
That can be done with the following two terminal commands, with which you move the automatic launcher file of Update Notifier to a dedicated "parking lot":
At first you create the parking folder, with this terminal command:
sudo mkdir -v /parking
Then you move the file to its parking lot with this command line (it's one line!):
sudo mv -v /etc/xdg/autostart/update-notifier.desktop /parking
h. Then you launch the application Software & Updates. Click on the tab Updates and set Automatically check for updates: to Never. With that, you've adequately restricted the Ubuntu update tools.
i. Reboot your computer.
j. In some Ubuntu flavours you might need to do this in order to make the Update Manager icon appear in the system tray: launch Update Manager - panel: Edit - Preferences
Enable the following option:
Use AppIndicator for the tray icon (more limited but supports more desktops)
k. Timeshift is a nifty tool, but it definitely needs some restraints on its potential disk usage. This is how to do that (item 7).
l. Enjoy!
Advanced users only: "dirty" method without using the Bodhi repo
3.1. Only for advanced users: there's also a "dirty" method which doesn't require using the Bodhi repo. It's dirty, because it requires using dpkg with the --force-all parameter, and also requires executing apt for applying --fix-broken.Nevertheless, if you want to use it, download this compressed archive package from my Google Drive, unpack it and apply the terminal commands in the text document contained in the archive package.
How to undo
4. Regrets? Unlikely to have those, but you can undo all this as follows:a. Remove the two installed applications and their supporting package, with this terminal command (it's one line!):
sudo apt-get remove mintupdate timeshift mint-common
b. Move the starter for Ubuntu's Update Notifier back to its old spot, with the following command:
sudo mv -v /parking/update-notifier.desktop /etc/xdg/autostart
c. Launch the application Software & Updates, go to its tab Other Software and remove the software source from Bodhi Linux from your sources list.
d. Still in Software & Updates: click the tab Updates and set Automatically check for updates: to Daily.
e. Reboot your computer. All should be as it was before.
To the content of this website applies a Creative Commons license.
Back to the home page
Disclaimer