Contents of this page:
- 1. Introduction
- 2. Repair Grub for computers with modern UEFI-BIOS
- 3. Repair Grub for very old computers with old-fashioned BIOS
- 4. Adapt Grub: don't use Grub Customizer
- 5. Adapt Grub: making Windows the first option in the Grub boot menu
- 6. Adapt Grub: switching the dominant Grub on a multiboot system with more than one Linux
- 7. Adapt Grub: making the menu look nice
- 8. Adapt Grub: changing the normal menu timeout
- 9. Adapt Grub: modifying the entries in the menu of a multiboot PC
- 10. Grub boot menu: how to make it visible
- 11. Grub boot menu: how to enlarge its text
- 12. Other text colour in the Grub menu
- 13. Adapt Grub: some advanced options explained in more detail
- 14. Removing Grub (back to Windows only)
Introduction
1. The Grand Unified Bootloader, better known as Grub, is the most common boot loader for Linux. That's well deserved: the thing actually boots all conceivable operating systems. All Linux distributions, all types of Windows, all types of DOS, all kinds of BSD, Apple Mac OS, you name it. It's a small miracle of technology.On my multiple boot laptop there once were 10 different operating systems in the menu of Grub: they all lived brotherly side by side on the same hard drive ....
Grub is evidence of the strength of simplicity: the program is very simple, but also powerful and versatile.
Yet you can occasionally come across a problem with Grub. Here you'll find solutions for the two most common problems: how to repair it and how to remove it. Plus some tips for adapting it.
Repair Grub for computers with modern UEFI-BIOS
2. A computer with a pre-installed Windows 8 or newer has a UEFI-BIOS that's running in full UEFI mode. On such a computer you might, after a successful installation of Linux Mint, suddenly lose the possibility to boot Linux Mint.For example this might happen because you've reset your UEFI-BIOS to its defaults, or because you've upgraded your UEFI-BIOS to a later version. Or because Windows Update has bluntly overwritten Grub by an updated Windows Boot Manager.
Thankfully this problem is not difficult to solve. Provided that you apply the how-to below, with exact precision.
Note: This how-to is only fit for modern motherboards that run on UEFI-BIOS in full UEFI mode. This is usually the case for computers that were sold with a pre-installed Windows 8 or newer.
But this how-to is definitely unfit for very old computers that run on an old-fashioned BIOS. This usually means a computer that was sold with a pre-installed Windows 7 or with an even older Windows version.
The how-to for old-fashioned BIOS can be found here.
A computer that's running on a modern UEFI-BIOS in full UEFI mode, usually is a computer with a pre-installed Windows 8 or newer. The how-to below is therefore based on a Linux Mint that has suddenly "disappeared" from a dual boot machine that also has Windows 8 or newer on it.
This is how you do it:
a. Boot your computer from the live USB memory stick with Mint on it (or the Mint DVD).
Note: Only use the memory stick or DVD of the Mint version that you wish to repair. So for Linux Mint 22.3, use the USB stick of 22.3. For repairing Ubuntu 24.04 and higher, use Mint 22.x, which is identical to Ubuntu 24.04 "under the hood".
b. Connect to the internet. Wireless or wired, that doesn't matter. But you need internet connection.
c. From the menu of Mint, launch the application Boot Repair. It'll request to update itself; allow that. Afterwards re-launch it and ignore any new update requests.
d. Go with the flow: let it perform a boot repair attempt with the recommended default settings. Ignore a potential error report at the end, about a locked NVRAM.
e. Reboot normally. Your Mint might now be called Ubuntu in the Grub bootloader menu; you should be able to correct that by running sudo update-grub (note the dash between update and grub!) in the terminal (you can launch a terminal window like this: *Click*).
f. Still can't boot your Mint? Then the EFI line of Mint has probably been wiped from the EFI System Partition, which occasionally happens after a BIOS update (blame your hardware manufacturer....). Check the BIOS settings to verify this (the boot order should contain an item called Ubuntu).
If it's missing, that should be solvable like this:
g. Boot again from the Mint live USB. In the live session, launch a terminal window.
(You can launch a terminal window like this: *Click*)
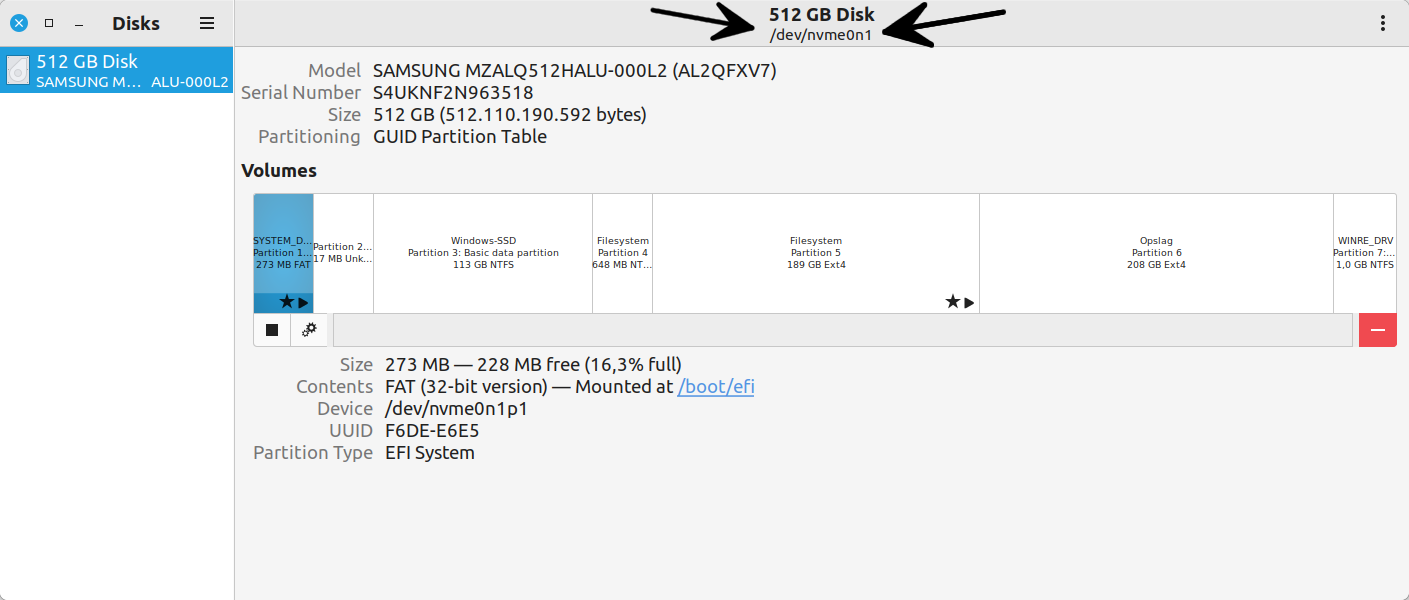
h. Check how your hard disk is called. It's usually either sda or, in case of a NVME SSD, nvme0n1. For checking, launch the application Disks (gnome-disks), which should help you to identify the disk name. The two black arrows in the screenshot below, are pointing to the disk name (click on the image to enlarge it):
i. For a disk called /dev/sda, use copy/paste to transfer the following command line into the terminal (it's one long line):
sudo efibootmgr -c -d /dev/sda -p 1 -l \\efi\\ubuntu\\grubx64.efi -L "Linux Mint"
Press Enter.
For a disk called /dev/nvme0n1, use copy/paste to transfer the following command line into the terminal (it's one long line):
sudo efibootmgr -c -d /dev/nvme0n1 -p 1 -l \\efi\\ubuntu\\grubx64.efi -L "Linux Mint"
Press Enter.
j. Re-launch Boot Repair and proceed like before.
k. Reboot normally. Your Mint might be called Ubuntu in the Grub bootloader menu; you should be able to correct that by running sudo update-grub (note the dash between update and grub!) in the terminal.
Repair Grub for very old computers with old-fashioned BIOS
3. The how-to for repairing Grub for very old computers with a pre-installed Windows 7 or earlier (with old-fashioned BIOS) can be found here.Now the section about adapting Grub.
Adapt Grub: don't use Grub Customizer
4. First a warning: don't use tools like grub-customizer for customizing Grub! Your bootloader is far too vital and fundamental to be tampered with by risky stuff that's not even in the official repositories. For safe tweaks, see the items below.Adapt Grub: making Windows the first option in the Grub boot menu
5. At the beginning of their Linux adventure, many people want to make Windows the default operating system to boot in the Grub menu (you'll get over it!).That's not hard; this is how you do it (item 1).
Adapt Grub: switching the dominant Grub on a multiboot system with more than one Linux
6. When you install more than one Linux operating system on your machine, the dominant Grub is always.... the one of the Linux that you've installed last. At least when you didn't change its default installation options.This means that what you get to see when you turn on your computer, is the Grub menu of that latest Linux, with that latest Linux as default first boot line.
That can be a problem if you prefer the Grub menu of the oldest Linux. For example because you want to have that oldest Linux as first boot line.... This is how to change dominance back again to the old Grub:
a. Boot into the oldest Linux operating system, namely the one whose Grub should become dominant again.
b. Launch a terminal window.
(You can launch a terminal window like this: *Click*)
c. First you're going to inform the non-dominant old Grub about the presence of a newly installed other Linux. For that, copy/paste the following command line into the terminal:
sudo update-grub
Press Enter. Type your password when prompted. In Ubuntu this remains entirely invisible, not even dots will show when you type it, that's normal. In Mint this has changed: you'll see asterisks when you type. Press Enter again.
d. Now switch Grub dominance back with this terminal command:
sudo grub-install
Press Enter.
e. Done! When you reboot, you should again see the old Linux as first boot line in your Grub menu. Meaning that the Grub dominance switch has succeeded.
Locking Grub to its current version
6.1. Especially on a multiboot computer with more than one Linux, it can help to prevent problems when you lock all Grub-related packages to their current version (freeze them). In each installed Linux distro. Thus effectively preventing updates for Grub from messing up your boot order.For that, do the following in each installed Linux distribution:
a. Launch a terminal window.
(You can launch a terminal window like this: *Click*)
b. Copy/paste the following command line into the terminal:
sudo apt-mark hold "grub*"
Press Enter. Type your password when prompted. In Ubuntu this remains entirely invisible, not even dots will show when you type it, that's normal. In Mint this has changed: you'll see asterisks when you type. Press Enter again.
Want to undo? Undoing is easy; for that, you can use this command:
sudo apt-mark unhold "grub*"
Adapt Grub: making the menu look nice
7. The Grub menu, from which you can choose what operating system to boot, is functional but not very nice....Fortunately the looks of the Grub menu can be improved greatly. In Linux Mint you can do this:
a. Launch a terminal window.
(You can launch a terminal window like this: *Click*)
b. Copy/paste one of the following two blue command lines into the terminal:
For normal text size:
sudo apt-get install grub2-theme-mint
For big text size:
sudo apt-get install grub2-theme-mint-2k
Press Enter. Type your password when prompted. In Ubuntu this remains entirely invisible, not even dots will show when you type it, that's normal. In Mint this has changed: you'll see asterisks when you type. Press Enter again.
c. Reboot.
But you can also use a holiday picture as background for the menu.
Adapt Grub: changing the normal menu timeout
8. In the configuration file /etc/default/grub you can change the timeout of the Grub menu as you please.Note that setting it to 0 will probably have no effect: the system is likely to reset it to 10 seconds.... A workaround is setting GRUB_TIMEOUT to 0.1 because the system does always accept one tenth of a second.
Below I'll explain step-by-step how changing the timeout can be done, by using the example of setting the timeout to 3 seconds:
a. Launch a terminal window.
(You can launch a terminal window like this: *Click*)
b. Copy/paste the following command line into the terminal:
xed admin:///etc/default/grub
Press Enter.
(the three consecutive slashes are intended and no typo!)
c. Set the timeout to 3 by modifying the existing timeout line:
GRUB_TIMEOUT=3
Save the modified file and close it.
d. Copy/paste the following command line into the terminal, in order to execute the modification:
sudo update-grub
Press Enter. Type your password when prompted. In Ubuntu this remains entirely invisible, not even dots will show when you type it, that's normal. In Mint this has changed: you'll see asterisks when you type. Press Enter again.
(if you type the command: note the dash between update and grub)
e. Reboot and test: your Grub menu should be visible for three seconds now.
Adapt Grub: changing the recordfail_timeout
8.1. Grub contains a setting for its normal timeout during which it shows its boot menu, but also one for the timeout in case of a preceding disaster (a crash or a forced reset). This emergency timeout is set at 30 seconds, in order to give you ample time for booting into recovery mode and doing some troubleshooting.So far, so good. But under certain circumstances, notably when your computer has an exotic filesystem, Grub may always apply this emergency timeout on every boot. That can be cumbersome.
It's not a good idea to disable the emergency timeout completely; in case of disasters it's helpful for troubleshooting. But this is how to set the emergency timeout at a more reasonable setting, namely 10 seconds:
a. Launch a terminal window.
(You can launch a terminal window like this: *Click*)
b. Copy/paste the following command line into the terminal:
xed admin:///etc/default/grub
Press Enter.
(the three consecutive slashes are intended and no typo!)
c. Copy/paste the following line below the existing text in that text file, so that it becomes the last line in it:
GRUB_RECORDFAIL_TIMEOUT=10
Save the modified file and close it.
d. Copy/paste the following command line into the terminal, in order to execute the modification:
sudo update-grub
Press Enter. Type your password when prompted. In Ubuntu this remains entirely invisible, not even dots will show when you type it, that's normal. In Mint this has changed: you'll see asterisks when you type. Press Enter again.
(if you type the command: note the dash between update and grub)
e. Reboot.
Adapt Grub: modifying the entries in the menu of a multiboot PC
9. Do you have a multiple bootable computer, on which you've installed more than one version of Linux Mint? Then it can be useful to customize the Grub menu entries, so that it's clearer for you which Linux you'll boot.Grub boot menu: how to make it visible
10. On a single-boot computer, you might never get to see the Grub boot menu when you turn on your computer. There are two ways to make it visible: one-time only and permanently. I'll describe both methods below.Making the Grub boot menu visible one-time only
10.1. You can make the Grub boot menu visible one-time only after turning on your computer, in the following way:a. There's an impractical (hard) way to make it visible, namely by tapping the Esc key just once on the exact magical right moment.
But the practical (easy) way is to hit the Esc key repeatedly, immediately after the BIOS screen disappears. That'll give you a Grub command prompt on a black screen, without the menu.
b. No worries, however: at the Grub prompt, type the word normal and hit Enter. Then immediately start tapping the Esc key again repeatedly, until the menu is displayed after all.
This time, don't worry about hitting Esc too many times: tapping the Esc key more than once at this point, won't drop you to the Grub command prompt anymore but will (finally!) give you the long-awaited boot menu.
Making the Grub boot menu permanently visible
10.2. Want to see the Grub boot menu always, on a single-boot computer? You can make the Grub boot menu permanently visible like this:a. Launch a terminal window.
(You can launch a terminal window like this: *Click*)
b. Copy/paste the following command line into the terminal:
xed admin:///etc/default/grub
Press Enter.
c. Find the following line:
GRUB_TIMEOUT_STYLE=hidden
Change "hidden" into "menu", so that it becomes:
GRUB_TIMEOUT_STYLE=menu
d. Then find this line:
GRUB_TIMEOUT=0
Change "0" into "5", so that it becomes:
GRUB_TIMEOUT=5
With that, you set the time during which the menu will be shown to five seconds, which should be more than enough.
e. Save the modified file and close it. You're not quite done yet now, so proceed with the final step:
f. Copy/paste the following command line into the terminal, in order to actually apply the configuration changes you've made:
sudo update-grub
(if you type this: don't omit the dash between update and grub!)
Press Enter. Type your password when prompted. In Ubuntu this remains entirely invisible, not even dots will show when you type it, that's normal. In Mint this has changed: you'll see asterisks when you type. Press Enter again.
g. You're done! Test it by a reboot.
Grub boot menu: how to enlarge its text
11. Usually, the Grub boot menu is already shown in the right resolution for your display. That produces the nicest letters, but sometimes they are far too small. Which may cause a problem for people with decreased eyesight, or might simply be annoying for everybody.You can enlarge the size of the letters in the Grub boot menu as follows.
a. In Linux Mint you can increase the text size in the menu of bootloader Grub, simply by installing a dedicated magnifying package for it. Which adorns the menu a bit as well. The mere installation itself is enough; no further action required. Proceed like this:
I. Launch a terminal window.
(You can launch a terminal window like this: *Click*)
II. Copy/paste the following terminal command (this is one line):
sudo apt-get install grub2-theme-mint-2k
Press Enter. Type your password when prompted. Press Enter again.
III. Reboot and enjoy.
b. Don't like it? Then remove the theme package and simply specify a lower screen resolution, which makes the letters bigger as a side effect. For that, you can proceed like this:
I. Launch a terminal window.
(You can launch a terminal window like this: *Click*)
II. Then copy/paste this command into the terminal:
xed admin:///etc/default/grub
(in Ubuntu, replace xed by gedit)
Press Enter.
III. In the text file that has opened, find the following text:
# The resolution used on graphical terminal
# note that you can use only modes which your graphic card supports via VBE
# you can see them in real GRUB with the command `vbeinfo'
#GRUB_GFXMODE=640x480
Remove the hash # from the bottom line of that text, so that this bottom line becomes:
GRUB_GFXMODE=640x480
IV. Save the modified text file and close it.
V. Then copy/paste this command line into the terminal:
sudo update-grub
Press Enter.
VI. Reboot your computer. The letters in the Grub menu should be a lot bigger now.
Letters too big? Then set the resolution at 800x600 instead of 640x480.
Other text colour in the Grub menu
12. The text colour in the Grub menu sometimes isn't ideal: for many picture backgrounds, the text is only poorly readable. You can improve that as follows (white text, purple active line):a. Use copy/paste to transfer the following line to the terminal:
xed admin:///etc/grub.d/40_custom
Press Enter. Type your password when prompted.
b. For changing the colour of the menu entries, add the following two lines below the existing text (use copy/paste to transfer them):
set menu_color_normal="white/black"
set menu_color_highlight="magenta/black"
Those colours are just examples, which you can change at will. Potential colours are red, green, blue, cyan, magenta. You can precede them with the expression light (e.g. light-red). Also allowed are white, black, light-gray, dark-gray, yellow, brown.
c. Save the modified text file and close it.
d. Then in the terminal (use copy/paste to transfer the command line):
sudo update-grub
Press Enter.
e. Reboot and test.
Adapt Grub: some advanced options explained in more detail
13. Read more about some useful Grub options here (explanation in more detail).Removing Grub (back to Windows only)
14. Removing Grub is actually a pity.... it's such a beautiful tool! However, it'll increase your confidence in Grub if you know how to remove it as well.In short, removing Grub means the replacement of Linux bootloader Grub, by the Windows Boot Manager, in the Master Boot Record (MBR) of the hard disk. There are several ways to do that.
With the installation DVD of Windows 10 or 11
14.1. If you have Windows 10 or 11, you need a real installation DVD of Windows 10 or 11, so no mere recovery disk. Don't you have such an install DVD? Then get a free legal copy of an evaluation disc of Windows 11 Enterprise, from Microsoft itself.You do need to fill out a registration form for that. Not necessarily with your real personal data, however.
Burning the .iso file needs to be done in a special way: click for the how-to.
What you have to do with the DVD of Windows 10 or 11, is described on this page.
With the free Ultimate Boot CD
14.2. No installation DVD of Windows? Then you can restore Windows Boot Manager also by using the free Ultimate Boot CD (UBCD). You can download it here.Pick the .iso of the stable version, and burn it on a CD or DVD as a raw image.
Boot your computer from the UBCD (make sure that the DVD drive is first in the boot order in the BIOS).
UBCD contains several tools to restore Windows Boot Manager in the MBR. I'll describe the use of one of them.
Select HDD in the menu, then Boot Management, then Super Grub Disk. Then press Enter again, in order to start the Super Grub Disk. Then you choose:
Win => MBR & !WIN! :(((((((((((((((((((((((((((((((((
Press Enter.
By the way: the multitude of parentheses (sigh) isn't my idea, but the idea of the maker of the Super Grub Disk...
Now you're done! Reboot your computer normally. Your computer should boot up Windows now.
With a USB memory stick
14.3. Finally, you can also use a USB memory stick for this job. It takes three applications: Unetbootin, FreeDOS and TestDisk for DOS.a. First download Unetbootin and use it to make a bootable USB memory stick. Choose Freedos when prompted for a distribution to install on it.
b. Download TestDisk for Dos/Win95/Win98 (so don't select the Windows version!).
c. Unzip the files testdisk.exe and CWSDPMI.exe, and put them on the bootable memory stick (not in a folder, just straight on it).
d. Boot your computer from the memory stick. At the Default window, simply press Enter.
e. Now FreeDOS is being launched. Choose:
FreeDOS Safe Mode (don't load any drivers)
Press Enter.
f. Then type: C:
Press Enter.
g. Now type: testdisk
Press Enter.
h. Select [No Log]
Press Enter.
i. Select the hard drive concerned: usually the second option (the first option is the memory stick itself!).
Press Enter.
j. Select [Intel]
Press Enter
k. Select [MBR Code] and press Enter. When prompted, type y (yes) and press Enter again.
Now you're done! Reboot your computer normally. Your computer should boot up Windows now.
Want more?
Do you want more tips and tweaks? There's a lot more of them on this website!
For example:
Speed up your Linux Mint!
Clean your Linux Mint safely
Avoid 10 fatal mistakes
To the content of this website applies a Creative Commons license.
Back to the home page
Disclaimer