Back to the home page
Dual boot the easy way
Windows can stay on your computer, when you install Linux Mint! It's handy to turn your computer into a dual boot machine. That way you can choose each time you turn on your computer, what operating system you want to boot: Mint or Windows.
Contents of this page:
- 1. Create an external backup of your documents
- 2. Let Windows perform a disk check
- 3. Simplify your hardware
- 4. Windows 10 or 11: change a couple of settings
- 5. The actual installation
- 6. Potential problem: no option to preserve Windows
- 7. Disk partitioning
- 8. Is there no boot menu and does Windows 10 or 11 start rightaway?
- 9. Windows has to adjust itself
- 10. Prevent a clock time shift between Windows and Linux
- 11. Future Windows updates might cause a boot problem for Linux (but the fix is easy)
- 12. Done! What's next?
It's easy to turn your computer into a dual boot:
Create an external backup of your documents
1. Backup all your documents, pictures, music et cetera, on an external storage volume (DVD-RW, external USB hard disk, flash memory stick).Let Windows perform a disk check
2. Make Windows perform an error check on the hard disk. In Windows 10 and 11 the procedure is as follows:- Swipe in from the right edge of the screen and tap Search. Or if you're using a mouse, point to the upper-right corner of the screen, move the mouse pointer down, and then click Search. Enter This PC in the search box, and then tap or click This PC.
- Right-click the drive you want to repair, and then tap or click Properties.
- Tap or click the Tools tab, and then, under Error checking, tap or click Check. Administrator permission required! You might be asked for an admin password or to confirm your choice.
- Follow the instructions. You might need to restart your PC after the error checking has finished.
Note: defragmentation is unnecessary! That saves a lot of time....
- Shut down your computer.
Simplify your hardware
3. It's important to simplify your hardware: temporarily unplug all peripherals from your computer, except for display, mouse, keyboard and printer. Do you use an USB hub? Then remove that temporarily as well, and connect mouse, keyboard and printer directly to the USB ports in your computer.After the installation you can reconnect all your peripherals again; they'll probably work out of the box then.
Make sure you can establish internet connection during the installation. If you have a laptop, connect the power cord as well: you definitely don't want to run the risk of an empty battery during the installation of an operating system.
Windows 10 or 11: change a couple of settings
4. For Windows 10 or 11, you have to do some settings changes before you can install Linux Mint next to it. Don't omit them; they're essential!The actual installation
5. a. Boot your computer from the Mint USB thumb drive / DVD (are the BIOS settings OK for booting from that?), and choose "Check the integrity of the medium", thus performing an integrity check on the USB thumb drive / DVD. It has to be completely error free. If it's not, re-create it; for a DVD, it might help to burn a new DVD at low speed (4 x).b. A few seconds after a successful completion if the check, the Mint USB thumb drive / DVD will boot automatically. In the trial (live) session you can find out if all your hardware works like it should. Note: in the live session Mint functions much slower than usual!
c. You can start the installation by clicking the special desktop shortcut for it, called "Install Linux Mint". The installer will start by asking you a couple of questions. Only after you have made a choice for partitioning, installation will begin.
You'll be presented with this window (click on the picture to enlarge it):

Tick: Install multimedia codecs and click "Continue".
Note: did you get a window which also gives you the option to turn off secure boot? Then it's easiest to abort the installation, turn off secure boot in your UEFI (BIOS) settings and start the installation anew.
Because the option "Turn off Secure Boot" in the installer is a bit cumbersome: further on it'll force you to jump through some annoying hoops. Nonsense like: "type the third and the sixth letter of your disabling password".
Turning off secure boot in the UEFI (BIOS) is easier. No worries: although Secure Boot is a fairly reasonable idea in theory, it provides little real-life security anyway. So disabling it is no loss.
In practice, Secure Boot is primarily an obstacle for using another operating system than Microsoft Windows. Which might or might not be an intended side effect.
Afterwards you can start the installation of Linux Mint anew.
Then choose the option alongside Windows (sometimes called: Install Linux Mint alongside Windows Boot Manager), so that your Windows will be safe (click on the picture to enlarge it):

Note: When you don't have much experience with Linux yet, then do not select the LVM option in the Advanced features! Because that drastic option is only meant for advanced Linux users. This option can cause a lot of trouble for people with little Linux experience....
The Encrypt option is also potentially risky; only use it when it has a clear security advantage. For example on a computer that sometimes leaves your house and which contains sensitive information (like a laptop that you take with you to your work).
But don't apply the Encrypt option on a computer that's always in your house, like a desktop computer which is only in use by you and your family.
The disadvantage of encryption is, that your important data will be forever unreachable when you, for example, forget your password. Encryption is a very powerful tool; like all powerful tools, it should be handled with care.
Click Install Now.
Potential problem: no option to preserve Windows
6. Doesn't the installer offer you the option to preserve Windows and install Linux Mint alongside Windows? Then cancel the installation and have a look at this potential solution (written for Ubuntu, but applicable in Mint as well).Disk partitioning
7. One of the last questions will be a disk partitioning proposal. The installer will namely propose to free some space on the hard disk. Thus leaving somewhat less space for Windows, and allowing Mint to be put on the cleared space.Don't worry: the installer respects the disk space that's already used by Windows files, and only proposes to divide the remaining unused space on the hard drive.
This proposal looks approximately like this (click on the picture to enlarge it):

The mouse pointer is at the divider: move the divider at will. Your new Mint is on the right side.
In principle, you could simply agree with this proposal of the installer. However, on small hard drives the installer tends to underestimate the disk space (the surplus empty "breathing space") needed by either Windows or Mint. So you may want to increase the disk space for either Windows or Mint, by moving the slider with your mouse.
Click Install Now.
Note: Give Mint preferably no less than 100 GB. Mint is the block on the right.
In other words: the installer assumes automatically (by default) that you don't want to wipe Windows and that you want a dual boot computer. Mint is user friendly!
Note: Can't you finish the installation because it stalls halfway? Then maybe removing the slideshow can solve it (item 4).
Now the installation of Mint takes place, and in the end you'll have a dual boot computer.
Is there no boot menu and does Windows 10 or 11 start rightaway?
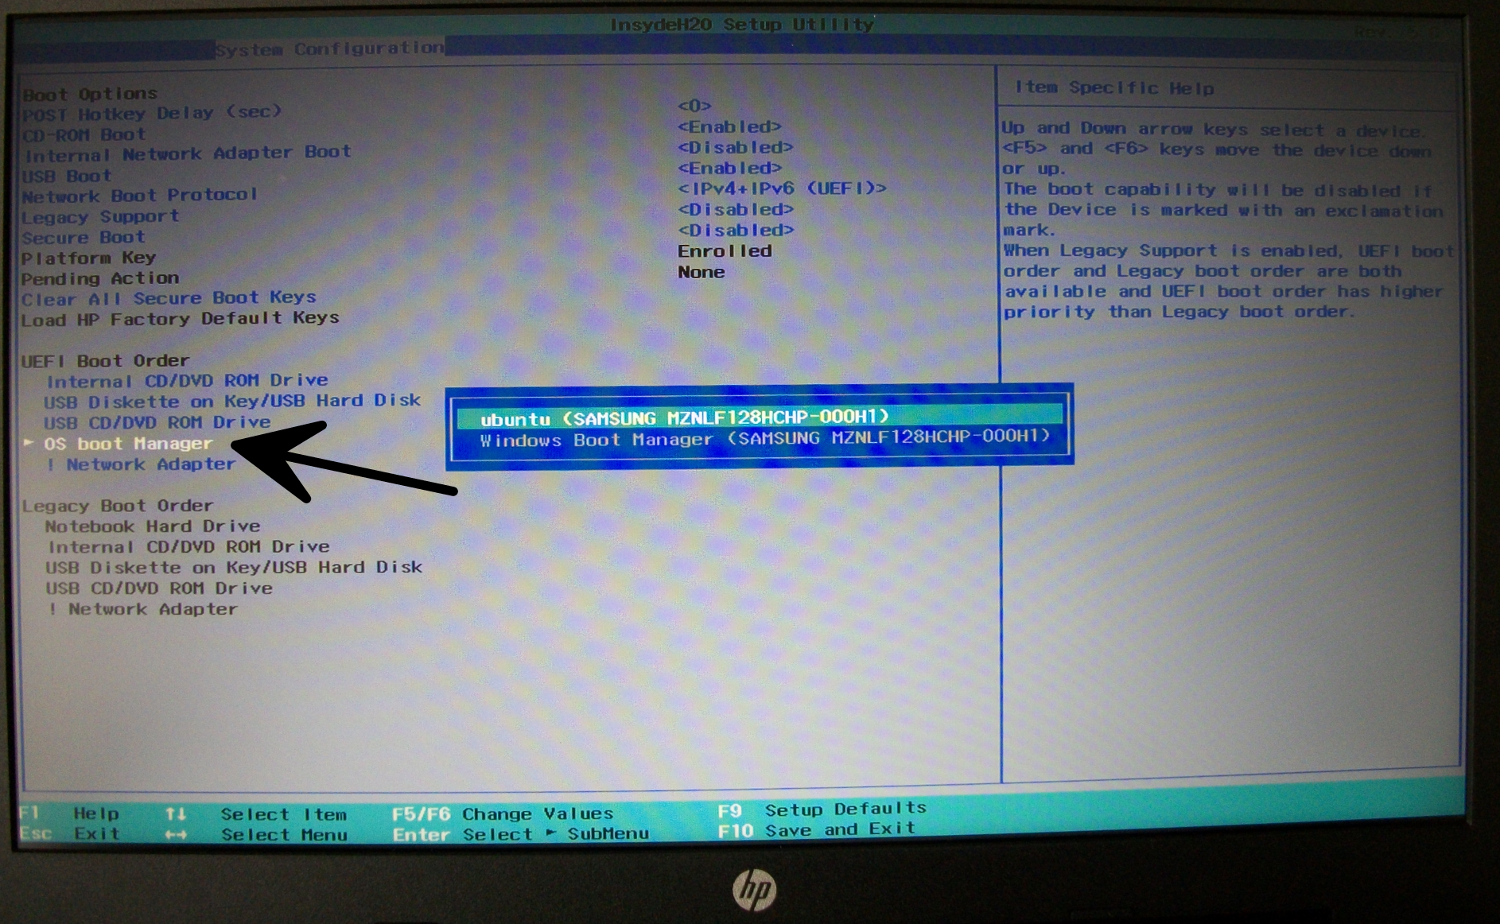
8. On modern computers who were sold with a pre-installed Windows 10 or 11, sometimes you don't get to see a boot menu after a seemingly succesful installation of Linux Mint. Instead of that, Windows boots rightaway, just as if no Linux Mint has been installed at all.Usually you can fix that by another change of the configuration of the UEFI (BIOS). In the "boot options" of the UEFI, find the item "OS boot manager". Select it, press Enter and place Windows Boot Manager at the bottom (for HP laptops you can do that by means of the F5 key). Note that Linux Mint might be called "Ubuntu" by the BIOS.
See the screenshot below, of the relevant part of the UEFI settings of an HP laptop (click on the image to enlarge it):
Note: in the UEFI settings of an Acer laptop, I've seen a weird problem: after installation of Linux Mint, there were two instances of Windows Boot Manager in the boot priority. It turned out that the second one was actually the Linux Mint bootloader.... So all I had to do was to put that one on top of the list.
Windows has to adjust itself
9. The first time you start Windows in the dual boot configuration, Windows will discover that its disk space has shrunk. Windows has to adjust itself to that.During the first Windows boot you might therefore see a blue screen with white letters, informing you that Windows is checking the hard disk and "repairing" it with the application CHKDSK. Simply let it do its job.
Afterwards Windows will want to reboot. Go along with it. Then Windows will be used to its new disk space and will function normally.
Prevent a clock time shift between Windows and Linux Mint
10. Windows stores the time on the hardware clock as local time. Linux Mint on the other hand, stores it as UTC (formerly: Greenwich Mean Time). This causes annoying clock problems on dual boot machines: the time keeps shifting.It's easiest to make Linux Mint behave like Windows does, because Windows is more difficult to tame. It's actually a pity, because UTC makes more sense. Especially if you move your machine between time zones.
Below I describe two alternatives: the way to fix Windows (recommended, but slightly more difficult) and the way to modify Linux (not the best solution, but easier to apply). The choice is yours:
Alternative 1: setting Windows to UTC (recommended)
10.1. Want to tame Windows, even though it's slightly difficult? Right you are, because that's the most elegant solution. This is how:Launch Regedit (Registry Editor) and click your way through to the following "directory":
HKEY_LOCAL_MACHINE\SYSTEM\CurrentControlSet\Control\TimeZoneInformation\
In that "directory", create a new value, in the following way:
Right-click with your mouse on an empty white part of the Registry Editor window -
New - DWORD (32-bit) Value
(even in 64-bit Windows you have to select 32-bit DWORD here)
Give the new value the following name:
RealTimeIsUniversal
Press Enter to confirm the name.
Then double-click the new value and set its Value data to 1.
By default, Base should be set to Hexadecimal, which is what you want.
Click OK and close Registry Editor.
Reboot your Windows: it should show the same time as your Linux now.
You're done! Now there's no need to modify Linux.
Alternative 2: setting Linux to local time
10.2. Don't do this when you've already modified Windows as described in item 10.1!This is how to make Linux behave in the inferior Windows way, so your time won't shift any more on your dual boot machine:
a. Launch a terminal window.
(You can launch a terminal window like this: *Click*)
b. Use copy/paste to transfer the following command line into the terminal:
timedatectl set-local-rtc 1
Press Enter.
That should do the trick.
c. Check the status like this:
timedatectl status
Press Enter.
How to undo local time in Linux (back to UTC)
10.2.1. Want to undo local time for your hardware (go back to the superior default way of Linux Mint)? That's easy as well. Simply use this terminal command:timedatectl set-local-rtc 0
Future Windows updates (feature updates) might cause a boot problem for Linux (but the fix is easy)
11. There's a very annoying peculiarity in Windows, especially concerning the yearly so-called "feature updates". When Windows updates itself, it might (unseen, automatically, unasked for) change the boot order (boot sequence) in the BIOS. And put the Windows bootloader as the first entry, even though you had set the Mint bootloader (Grub) as number one....With the Windows bootloader in first position in the BIOS boot order, Windows will boot straightaway. You won't see the Grub bootloader menu again, until you enter the BIOS settings (boot section) and move the Linux entry from position number 2 back to position number 1. For the procedure, see item 8 on this page.
Something else that sometimes happens after Windows has updated itself, is a blue box that states "no boot device found" when you turn on your computer. A hard reset will result in a boot to Windows. Same fix: you must enter the BIOS settings and change the boot order again.
Done! What's next?
12. That's it! You're done. Now you can reboot into Mint and start polishing your new operating system. Mint comes in several desktop editions, so I've made three different pages:10 things to do after installing Linux Mint with the Cinnamon desktop
10 things to do after installing Linux Mint with the MATE desktop
10 things to do after installing Linux Mint with the Xfce desktop
To the content of this website applies a Creative Commons license.
Back to the home page
Disclaimer